CHEESE STEAK SUBS
Directions:
DIY Pancake Mix
Why pay so much money to your local pizzeria for a great tasting steak and cheese sub, when you can make your own from home. I was a standing in line at the grocery store and I asked the cashier to help me find jarred "Cheez Whiz." She was not really sure about what I was talking about. She called someone over and asked him to help. He thought I was referring to spray cheese in a can. So, he searched the store and found jar "Cheez Whiz." We got into a conversation of what I would use it for and I told her, "Steak and Cheese subs, of course." She didn't realize you could make your own. I thought everyone knew how to make their own. If you never made your own, you are missing out. Try this recipe as soon as you can. Forgive me for there are no measurements and times. My husband gets so upset with me because I never follow "Kitchen Rules." I go by my senses.
Ingredients:
Butter or oil
Sirloin Steak
Green Pepper
Onion
Jarred Banana Peppers
Cheez Whiz
Mayonnaise
Salt
Pepper
Rolls (We love Costanzo's rolls, they use the in the pizzerias)
Directions:
1. Heat a little butter or oil (whatever is your preference) in a pan over medium heat on the stove top.
2. In the meantime, slice the sirloin steak very thin. (It helps if it slightly frozen, so it doesn't rip or tear.)
3. Put the steak in a medium hot pan and season it with salt and pepper. (Do not overcrowd the pan. Cook in batches if needed and cook until it is done to your liking.)
4. Heat another pan on the stovetop, over medium heat.
4. While the steak is cooking, dice the onion pepper, and chop the banana peppers. Throw these dice veggies in the second pan. Cook them for a few minutes until they start to soften and brown.
Preparing your rolls...
1. Spread cheese whiz on both sides of the inside of the rolls. This will help you to get a taste of the cheese with every bite. MMMMMM...I love cheese!
2. Spread a thin layer of mayonnaise on top of the cheese layers.
3. Place some of the meet and veggie mixture in the sub roll and place the subs on a cookie sheet.
4. Warm the subs in the oven under 350 degrees for a few minutes. Do not over cook or it will burn or be too crispy.
5. Serve right away and enjoy the cheesy goodness of a real tasting homemade steak sub.
Note...Feel free to add canned or sliced mushrooms to the onion/pepper mixture. Also, you can dress your sub with freshly sliced tomatoes and shredded lettuce. I don't like it this way, but what is good for me, might not be for you.
DIY Pancake Mix

If you like light and fluffy pancakes, you will love these!
I've tried many homemade pancake mixes. This one by far is the best! Thanks to Momables, I am able to give my kids a wonderful homemade breakfast where I know all of the ingredients involved. They are deliciously fluffy and quick to make, too!
Here is the recipe copied from Momables:
Author: MOMables.com
Recipe type: Breakfast
Serves: 6
Ingredients
For the DIY Pancake Mix bag:
- 1½ cups all purpose flour
- 3½ teaspoons baking powder
- 1 Tablespoon sugar
- ½ to 1 teaspoon salt (depending on preference)
To cook One DIY Pancake Mix Bag:
- 1¼ cups milk
- 1 egg
- 3 tablespoons butter, melted (optional)
Instructions
- In a zip bag or air-tight container put the flour, baking powder, salt and sugar.
With a permanent marker write on the outside of bag to add:
- (1¼) cups milk
- (1) egg
- (3) tablespoons butter, melted (optional)
To use DIY Pancake Mix:
- Pour all dry ingredients into a medium sized bowl. Add milk, egg and butter. Mix well to combine. Pour ¼ cup pancake batter on to the pan or griddle over medium heat. Wait until bubbles form to flip.
- Serve with fruit, syrup or whatever else you prefer.
Notes
This recipe makes approx. 10 to 12 pancakes
If adding melted butter to your mixes, make sure to add unsalted butter (or lower the amount of salt you put per mix)
You can sub half the amount of all purpose flour with whole wheat flour if desired.
If adding melted butter to your mixes, make sure to add unsalted butter (or lower the amount of salt you put per mix)
You can sub half the amount of all purpose flour with whole wheat flour if desired.
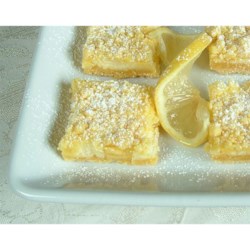
If you like lemon pie, you will love these lemon bars!
This recipe is so tasty and easy to make. I would even make it for family parties, they are that good. At first when I told my husband I was making lemon bars, he didn't seem too thrilled, but told me that whatever I make is usually good, so give it a try. After they were done, he tried them and loved them! I knew he would like them. They sounded fresh and the color is so bright. It reminds me of springtime, especially during this crazy winter we are having. I think the best part of this dessert is how much my kids love them! They ask for the leftovers every night for their dessert after dinner. The original recipe for this yummy dessert can be found at Allrecipes.com. I adapted the recipe as follows.
Easy Lemon Bars (source Allrecipes.com)
Ingredients:
1 (18.25 oz.) package of lemon cake mix with pudding
1 egg
1/2 cup vegetable oil
1 (8oz.) package of cream cheese
1/3 cup white sugar
Zest and Juice squeezed from 1 lemon
Directions:
1. Preheat oven to 350 degrees
2. Pour cake mix into a large bowl. Add the egg and oil; mix until well blended. Mixture will be slightly dry. Reserve one cup for the topping, and pat the rest into an small, ungreased glass baking dish. (The cuts should be thin, but cover the whole bottom of the dish.)
3. Bake for 15 minutes in the preheated oven. Set aside to cool. Meanwhile, in a medium bowl, beat the cream cheese with the sugar, lemon zest and lemon juice until smooth. Spread the mixture evenly over the baked crust. Crumble the reserved cake mix mixture over the top.
4. Bake for an additional 15 minutes in the preheated oven, or until filling is set and the topping is lightly toasted. Cool before cutting into bars. Refrigerate leftovers.
Enjoy!
Giant M&M Cookies

Well, it is officially a blizzard outside! All of the local schools in the area are closed and there is a travel ban in the area. As if that is not enough of a reason to keep you warm at home then maybe the minus 25 degrees below zero windchill is. Brrrrrrrr! What better way to spend this cold day then to bake yummy delicious cookies to smell up the whole house with sweet goodness! We used the recipe for "Giant M&M Cookies" found on Leenee's Sweetest Delight's Blogspot. Not only did my house smell tasty and sweet while baking these delicious treats, but it was the perfect way to end a cold and snowy day with good old fashion milk and cookies and a kid's movie!
Here is the recipe copied from Leenee's Sweetest Delight's Blogspot:
Giant M&M Cookies (source, What's Gaby Cooking)
Ingredients:
1 cup butter, softened
1/2 cup brown sugar
1 1/2 cups white sugar
2 eggs
2 1/2 teaspoons vanilla extract
2 1/2 cups of flour
1 teaspoon salt
1 teaspoon baking soda
1 teaspoon baking powder
1/2 bag of M&M's
Directions:
Cream together the butter and sugars in a mixer. Add the eggs and vanilla, making sure to scrape down the sides of the mixing bowl. Add the flour, salt, baking soda, and baking powder on low until everything is incorporated.
Chill the dough in the refrigerator for 2 hours.
When ready to bake, preheat the oven to 350 degrees F. Scoop out a 1/4 cup size of dough and roll it into a ball. Roll it around in some M&M's and place on a parchment lined baking sheet. Place 6 cookies on a sheet since they will spread due to their size. Bake for 12-14 minutes just until slightly golden around the edges. Remove from the oven and let rest on baking sheet.
*Note* They might look a little under baked in the center- but don't fear! They will continue to bake once removed from the oven.
Freezer Directions:
I actually double this recipe and eliminate the M&M's, so that I can have cookie dough on hand at any time. First, I I roll out smaller individual balls of this cookie dough, about a tablespoon size, and place them on a baking sheet. Next, I flash freeze the cookie dough. Lastly, I put them in a freezer ziplock bag and label it, Bake 350 degrees F for 12-14 minutes. When I want to bake these cookies, I place the amount I want on a cookie sheet, spread out, of course, and then I sprinkle each cookie with sprinkles. These cookies are always a hit with my kids and they make for a quick and delicious treat when company stops by!
No comments:
Post a Comment